We were going to rent a laser level but discovered that Home Depot sold one that cost less than the one-day rental.... This thing is very helpful in making sure that the posts are all set at the same depth....

This weekend is Jeff's birthday, our friend Mike Fuhr came up from Irvine to help us celebrate and to get a lesson in the careful art of precision post hole installation......We had a lot of fun and are VERY grateful for Mike's help....
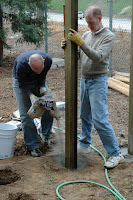
Here Mike and Jeff are using the laser level to check the depth of one of the holes before we placed the post...
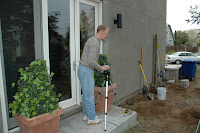
 Here is the laser and the tripod that it sits on....
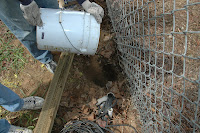
Once the hole was about an inch deeper than the target depth, we put gravel into the bottom of the hole....
After the gravel is poured in, we put the post in the hole and then re-checked the depth with the laser level and then used a level to make sure it was going in vertically (on both sides). We put in the two end poles first (and used a little geometry to figure out the exact location so that the line of posts would be square to the house and the lot.) and then rang a string between them so that the entire line of posts was lined up.
After the posts were aligned properly, the fast part was filling in around each one with bags of concrete post hole mix. These posts were set 30 inches in the ground.
Here is the first wall of the future utility enclosure that will store our garbage cans and yard furniture in the winter. The four tall posts in the middle will be repeated on the other side of the yard and we will string steel cables between them and string cafe lighting over our patio.
 Do you know what I mean? light strings like these...


This weekend is Jeff's birthday, our friend Mike Fuhr came up from Irvine to help us celebrate and to get a lesson in the careful art of precision post hole installation......We had a lot of fun and are VERY grateful for Mike's help....
Here Mike and Jeff are using the laser level to check the depth of one of the holes before we placed the post...
 Here is the laser and the tripod that it sits on....
Once the hole was about an inch deeper than the target depth, we put gravel into the bottom of the hole....

After the gravel is poured in, we put the post in the hole and then re-checked the depth with the laser level and then used a level to make sure it was going in vertically (on both sides). We put in the two end poles first (and used a little geometry to figure out the exact location so that the line of posts would be square to the house and the lot.) and then rang a string between them so that the entire line of posts was lined up.
After the posts were aligned properly, the fast part was filling in around each one with bags of concrete post hole mix. These posts were set 30 inches in the ground.

Here is the first wall of the future utility enclosure that will store our garbage cans and yard furniture in the winter. The four tall posts in the middle will be repeated on the other side of the yard and we will string steel cables between them and string cafe lighting over our patio.
 Do you know what I mean? light strings like these...
Comments